Näytetään tekstit, joissa on tunniste diy. Näytä kaikki tekstit

2014/11/13

♣ Broquet

Mun faijalla oli synttärit vähän aikaa sitten, ja kun kysyin häneltä, mitä hän haluaisi lahjaksi, vastaus oli kylmä "en yhtään mitään." Syy löytyi siitä, että faijan mielestä hänestä oli nyt tullut niin vanha, ettei hänen synttäreitä olisi syytä enää juhlia laisinkaan. Aluksi halusin arvostaa hänen synttäritoivettaan, mutta lopulta tajusin, että vaikka hän ei lahjoja haluaisikaan, ainahan synttärisankarille voi kukkia antaa, eikö? Faija sanoi "toki". Eli vihreä valo annettu, jes.

Onneks mä oon paljon ovelampi kuin uskoisikaan.

My Dad had his birthday a little while ago, and when I asked him what he wanted to receive as a gift he answered: "absolutely nothing." The reason was that the thought he was getting so old that his birthday shouldn't be celebrated anymore. At first I wanted to respect his birthday wish, but lastly I realized that even though he doesn't want gifts, you can still receive flowers on your birthday, right? He said "yeah, sure". Green light. Yes.

Luckily I'm sneakier than that. 
bro2
Oon varma, että monet teistä on tuttuja termin broquet kanssa, eli yleensä miehille tehtyjen kukkakimppujen, miehet kun ei yleensä kukista hirveästi välitä. Kimppu on yleensä täytetty lahjakorteilla, raaputusarvoilla, limsalla ja tupakalla tai alkoholilla. En tehnyt mitään eri tavalla - halusin vain näyttää oman versioni broquetista ja jakaa pari vinkkiä samalla.

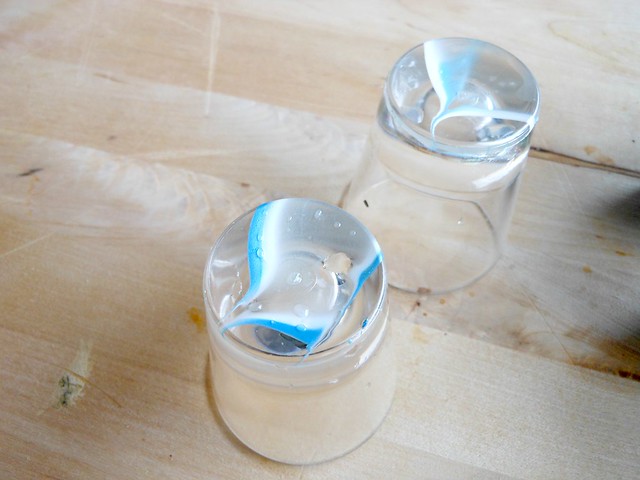
Yleensä broquetit kasataan lasimaljakkoon tai oluttuoppiin, mutta mä käytin niin paljon rahaa jo "kukkiin" yksinään, etten millään viittinyt ostaa kallista lasimaljakkoa, jota faija tuskin koskaan edes käyttäisi. Tämän takia palkitsin itseni Pepsitölkillä, juotuani sen pesin sen ja leikkasin irti koko päällimmäisen osan. Varmista, ettei reunoille jää teräviä osia (jos jää, niin taivuta ne tölkkiä vasten pihdeillä) ja täytä tölkki styroksilla tai muulla pakkausmateriaalilla.

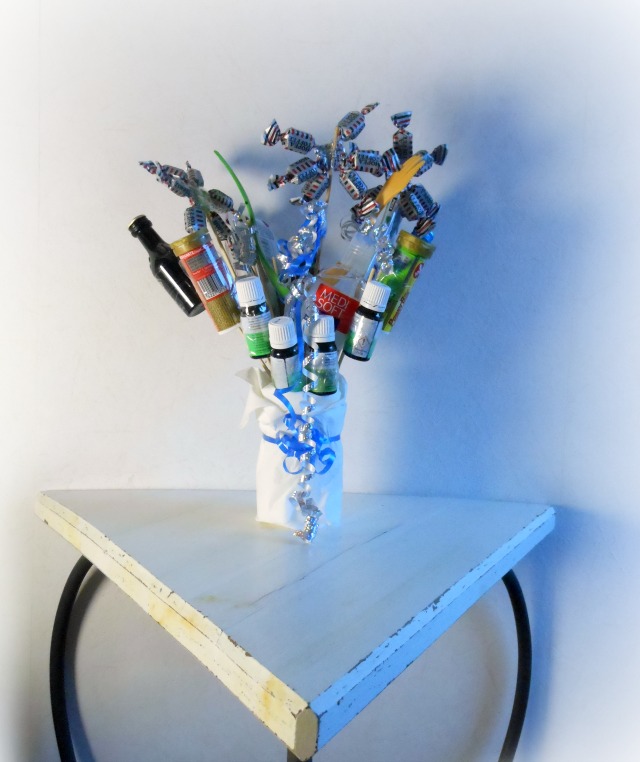
I bet many of you are familiar with broquets, bouqets made usually for males since they don't really care about flowers. The bouqet is usually filled with gift cards, scratchcards, candy, soda and cigarettes or alcohol. I did nothing different here - just wanted to show you my version of a broquet and share a few tips as well.

Usually broquets are assembled in a glass vase or a beer pint, however I spent so much money on the "flowers" alone that I really didn't want to buy an expensive glass vase that my Dad wouldn't probably ever even use. That's why I rewarded myself with a can of Pepsi and after I'd drank it, I washed it and cut out the entire top part. Make sure there's no sharp edges left on the can (if there are, just bend them in the opposite direction with pliers) and stuff the can with styrofoam or other packaging material. 
bro3
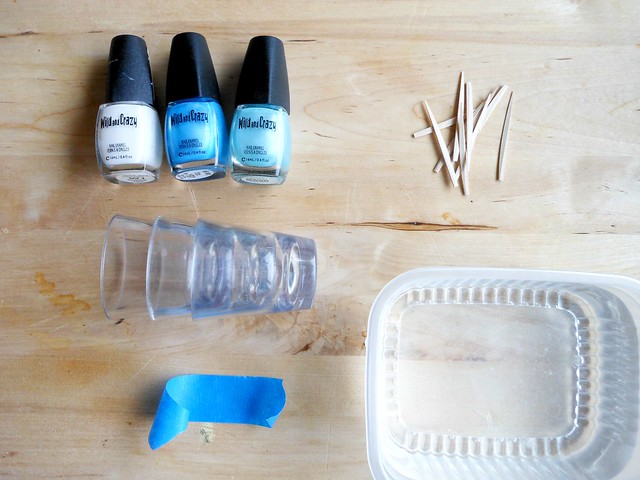
Seuraavaksi sun pitäisi löytää itsellesi pitkiä, puisia grillitikkuja, teippiä sekä tottakai tavarat kimppua varten. Käytä ihan naurettava määrä teippiä varmistaaksesi, että jokainen tavara pysyy juuri siinä, missä niiden pitäisikin pysyä.

Ja nyt, nyt on aika uhmata painovoimaa. Aluksi saa päähäsi edes jonkinlainen käsitys siitä, millaiseen järjestykseen tuotteet haluat kimppuun, ja sitten vain ala tökkimään niitä paikoilleen. Varmista, että paino on jakautunut tasaisesti jokaiseen suuntaan (mun tapauksessa paino oli aina hieman takana, ette voi edes kuvitella, kuinka monta kertaa koko juttu kaatui ja jouduin kasaamaan kaiken uudestaan). Ja nyt oletkin valmis!

Next you should get yourself some long wooden barbecue sticks, tape and, of course, the items for your broquet. Use a ridiculous amount of tape to ensure that each and every item stays where it should stay.

Now it's time to defy gravity. First have an idea in your head about the way you want the items to be located in the bouqet, and then just start poking them into place. Make sure the weight is equally on each side (mine had most of its weight always on the back, you cannot even imagine how many times it fell and I had to reorganize the whole bouqet). And... You're all done!
bro1
Noh, tää projektihan näyttää helpolta, mutta se on aivan kaikkea muuta. Mä käytin kokonaisen teippirullan ja silti kevyimmätkin tavarat, kuten proteiinipatukat, valuvat aina grillitikkua pitkin. Loppujen lopuksi, sä tosiaan taistelet painovoimaa vastaan teipin voimin. Eikä se edes ole vaikein osuus - vaikein osuus on epäilemättä koko kimpun sanomalehteen kääriminen. Joka tapauksessa uskon, että pääsin ihan hyvään lopputulokseen ja tiedän kyllä, että faija tulee olemaan sekä iloinen että yllättynyt.

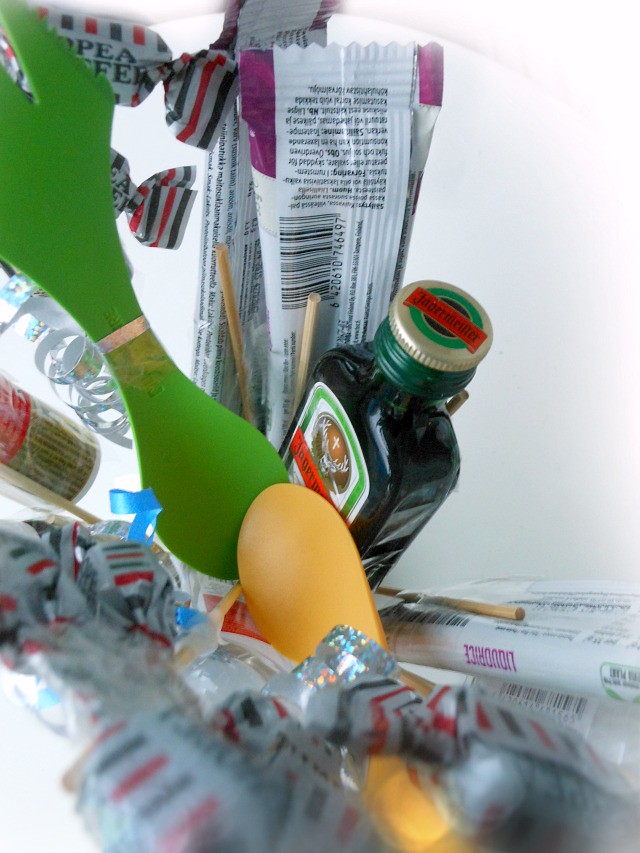
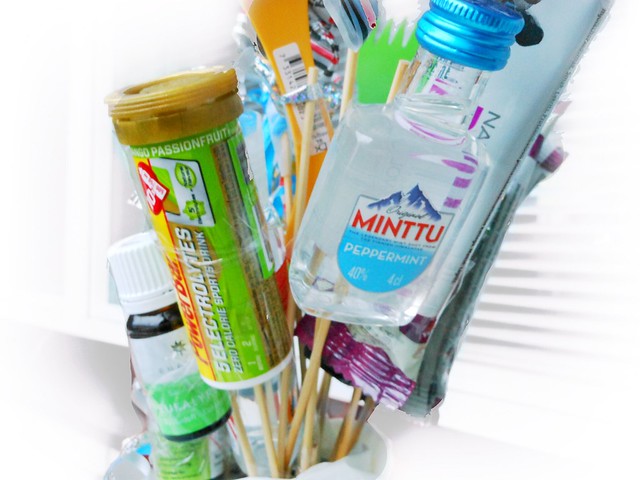
Niin, ja vielä loppuun lista asioista, joita mä käytin "kukkina" matkustelua, telttailua, saunaa, liikuntaa, hopeatoffeeta, lakritsia ja alkoholia rakastavan isäni kukkakimpussa: kalorittomia palautumisjuomia, kolme miniviinapulloa, kaks sporkia, matkakokoinen käsidesi, kolme kukkaa tehtynä hopeatoffeista, neljä pulloa saunatuoksuja sekä lakritsinmakuisia proteiinipatukoita.

Now, this project does look easy, but it's everything other than that. I used a whole roll of tape and still even the lightest items like protein bars keep sliding down the barbecue stick. After all, you are fighting against gravity with tape. And that's not even the hardest part - the hardest part is wrapping the whole thing in newspaper. Anyway, I think I did good and I know my Dad will be surprised and glad. 

Oh, and my list of things I used as flowers for my Dad who loves sauna, excercise, this candy called silver taffy, liquorice, liquor, traveling and camping: non-calorie recovery drinks, three mini bottles of liquor, two sporks, a travel-size hand sanitizer, three flowers made from silver taffy, four bottles of sauna scents and three liquorice flavored protein bars.

2014/09/03

♣ I am thankful.

Musta ei oo olemassa mitään tylsempää kuin kaupasta ostetut kortit, joten mä teen kortit itse jokaiseen tapahtumaan. Kuitenkin työnteon yllättää usein pieni ongelma: jos lähettelen kortteja useammille ihmisille, korttien täytyy olla identtiset ja sitä on aika vaikea saavuttaa käsin. Tai, no... oli vaikea saavuttaa, kunnes keksin tämän.

Tässä postauksessa näytän teille, miten lisätä identtistä tekstiä kortteihin ilman maalia, leimoja, tulostinta tai mitään kallista. Kaikki mitä tätä varten tarvitset ovat tussi (mä käytin kultaista), pala muovia (muovitasku sopii hyvin ja sellainen löytyy varmasti jokaisen kotoa), mattopuukko sekä nättejä korttipohjia.

I think there is absolutely nothing more boring than a store-bought card so I make cards myself for every occasion. However, usually there is one small problem: if I'm sending cards to a bunch of people, the cards have to be identical and that is slightly difficult to achieve by hand. Or... it used to be, until I came up with this idea.

In this post I'm gonna show you how to add identical text to cards without paint, stamps, a printer or anything expensive. Because everything you will need is a marker (I chose gold), a piece of plastic (a plastic folder will do the trick and that's probably something you already have at home), a box cutter and some pretty card bases.
thankyou1
Ensimmäisenä luonnostele teksti paperille. Varmista, että sisäosat kirjaimista, kuten a, e, o ja p pysyvät paikoillaan pikkuliuskoilla muovia, jotka jätät leikkaamatta.

First sketch your text on a piece of paper. Make sure the inner pieces of letters like a, e, o and p have a string of plastic that holds them in place. I made thank you cards, so my text was "kiitos" (thank you in Finnish).
thankyou2
Aseta muovitasku luonnoskortin päälle ja leikkaa mattopuukolla luonnosviivoja pitkin.

Place a plastic folder on top of the sketch card and with a box cutter cut along the lines you've drawn.
thankyou3
Kun tämä on valmista, laita korttipohja muovitaskun alle. Ala nyt hitaasti värittämään tekstiä viivojen sisäpuolelta tussilla. Älä anna musteen virrata liian paljon, se nimittäin tulee "vuotamaan" ja leviämään ja aiheuttamaan epätasaiset reunat. Tämän jälkeen poista muovitasku ja täytä viivat, jotka puuttuvat (eli ne osat, jotka jäivät muoviliuskojen alle). Ja olet VALMIS.

When you're all done, put a card base under the plastic folder. Now, with your marker, slowly start coloring the text inside the lines. Don't let the ink flow too much, it will "bleed" and spread and create blurry lines. After this part remove the folder and fill in the lines that are missing (the places that were under the strips that kept the inner pieces of plastic in place). And you are DONE.
thankyou6 thankyou7
Niin helppoa. Vaatii noin 30 sekuntia per kortti ja sulla on mielettömän helpot ja kauniit kortit, jotka eivät maksaneet lähestulkoon mitään.

So easy. Takes about 30 seconds per card and you have these incredibly easy and pretty cards that didn't cost you almost anything. 

2014/08/22

♣ If I were in your shoes... I'd add some DIY.

Valkoset Converset. Joo, sä rakastat niitä, mutta hitto, eiks ne oo tylsimmät kengät ikinä? Okei, okei, en mä vaan voi sanoa noin niistä kengistä - onhan ne myös ihanat ja upeat ja sopii joka asuun. Mutta kaikkien täytyy myöntää, että ne ovat vähän tylsät, siis VAIN vähän. Ovathan ne kuitenkin valkoiset. Ja vaikka ne ovat kauniit ja kaikkea, joskus mulla tulee houkutus koristella niitä hieman. Joskus taistelen houkutusta vastaan ja joskus, kuten tällä kerralla, mä häviän.

White Converse. Yes, you love them, but damn, aren't they the most boring shoes ever? Okay, okay, I can't say that about those shoes - they are lovely and they look gorgeous and go well with any outfit. But you gotta admit that they are a tad boring, JUST a tad. After all, they are white. And though they are beautiful and all, sometimes I get this urge to decorate them a little. Sometimes I fight the urge and sometimes, like this time, I lose.
cons2
Pari päivää sitten mä käytin mun tuntipalkan kirjontalankaan. Ei mun viisain siirto tähän mennessä, mutta kun näin mun uudet, päivitetyt Converset, en muuten tuntenut tippaakaan katumusta.

Eli tätä projektia varten tarvitset:
1. Sakset
2. Neulan
3. Kirjontalankaa
4. Converseparin, tai, no, minkä tahansa päivittelyä vailla olevan kenkäparin

I spent my hour salary on embroidery floss a couple days back. Not my wisest move so far, but when I saw my new, upgraded pair of Converse I felt no regret at all.

So, for this project you will need:
1. Scissors
2. A needle
3. Embroidery floss
4. A pair of Converse shoes, or, well, any shoes that call for an upgrade
cons1
cons5
Ensimmäinen askel on suunnitella kuvio. Tee se rauhassa ja pidä mielessä vaihtoehto, että muutat kuviota aika varmasti vielä silloinkin, kun olet jo ompelemassa sitä. Niin ainakin mulle kävi.
Seuraava askel on jollakin tapaa pakottaa lanka neulansilmään. Jos käytät pikkuriikkistä neulaa kuten minä, voin vannoa, että tähän tulee menemään pieni ikuisuus.
Kolmas askel on blokkia kaikki mitä aivosi yrittävät sinulle sanoa, kuten esim. "älä tee sitä! Pilaat täydellisen hyvät kengät!" ja vain painaa neula kengän läpi. Älä huoli, kyllä se siitä.
Ja lopuksi jatka niin pitkään, kunnes olet saavuttanut kuvion, josta pidät. Muista, että voit aina katkaista langat ja purkaa kaiken. Kukaan ei tule koskaan tietämään.

The first step is to create your design. Take your time and keep the option in mind that you'll probably change the design as you're already sewing. That's what happened to me, at least.
The second step is to somehow force the embroidery floss through the eye of a needle. If you're using a teeny tiny needle like me, this is gonna take time, I swear.
Step three is to block out everything your brain is trying to tell you, e.g. "don't do it! You'll ruin a beautiful pair of shoes!" and just push the needle through the shoe. Don't worry, it'll be fine.
And lastly just keep going until you have a pattern that you like. Remember that you can always just cut the thread and undo everything. No one will ever know.
cons3
Tältä mun (15 euron feikki-) Conversepari lopulta näytti.

This is how my pair of (something that I bought for 15 euros that tries to look like) Converse turned out.
ccoconcoc2
MÄ RAKASTAN NIITÄ.
I LOVE THEM.
cons4
En voi ymmärtää miten pätkä kirjontalankaa voi piristää kenkien ulkonäköä näin paljon. Ja nyt mä haluan lisätä kaikenlaista jokaiseen Conversepariin jonka omistan - tällä hetkellä olen jotenkin innostunut neonväreistä enkä voi lopettaa miettimästä mustien converseiden ostamisesta, jotka koristelisin neonvärisellä kirjonnalla!

I cannot understand how a strip of embroidery thread can brighten a pair of shoes this much. And now I'm dying to add a little something to every pair of Converse I own - right now I'm kind of excited about neon colors and I can't stop thinking about buying a pair of black Converse and adding some neon embroidery!

2014/08/17

♣ DIY photo playing cards


On kaksi asiaa, mitä mun isovanhemmat rakastaa: kuvia ja korttipelejä. Tein tämän lahjan heille, joka yhdisti nämä kaksi: DIY kuvallisia pelikortteja. Vaikka tein tämän isovanhemmilleni, kortit ovat täydellinen lahja kenelle tahansa: ystävänpäiväksi tee pakka täynnä kuvia sinusta ja rakkaastasi söpöillä sitaateilla, kaverin synttärilahjaksi korista pakka kuvilla hänen lempiartisteistaan ja -näyttelijöistään. Mahdollisuudet ovat rajoittamattomat ja mä vannon että kaikki rakastavat tätä lahjaa. Plus, nää on naurettaan helppoja tehdä!

There are two things my grandparents love: photos and card games. I made this gift for them that combined those two: DIY photo playing cards. Now, even though I made these for my grandparents, these make a perfect gift for anyone: for valentine's day make a deck of cards with pictures of you and your sweetheart with some cute quotes, for a friend's birthday make photo cards with pictures of their favorite singers and actors. There are limitless possibilities and I swear that everyone loves this gift. Plus, they're ridiculously easy to make!


Miten nämä tehdään: muokkaa korttipohja Paintilla (tai kopioi minun postauksen lopusta) ja kloonaa se 54 kertaa. Valitse 54 eri kuvaa ja rajaa kaikki niin, että ne mahtuvat korttien sisään ja sitten liitä aina yksi kuva yhden kortin keskelle. Sen jälkeen lisää numerot ja maat kirjoitustyökalulla ja tulosta kortit hieman normaalia tulostuspaperia paksummalle ja kiiltävämmälle paperille. Tulostuksen jälkeen leikkaa korttien reunoja pitkin ja näin käsissäsi on täydellinen, persoonallinen lahja, joka hyvin mahdollisesti maksoi sinulle ei mitään.

How to: edit a card base with Paint (or copy mine from the end of this post) and clone it 54 times. Choose 54 different pictures and crop them all so that they fit inside the card and paste the pictures in the middle of the cards. Then simply add the numbers and suits with a writing tool and print the cards on a slightly thicker, shinier paper than the usual printing paper. After printing cut along the edges of the cards and you have a perfect, personal gift that possibly cost you absolutely nothing.
poker3 poker4 Tässä pohja jota käytin, käytä sitä vapaasti myös itse! // Here's the base I used, feel free to use it yourself as well!


Tykkäsitkö, inspiroiduitko? Kerro kommentilla!
Liked them, got inspired? Write a comment!

2014/08/03

♣ Bubbles, berries and ice


Mä työskentelen marjabisneksessä ja kiitos henkilökunta-alennuksien tuon kotiin enemmän marjoja kuin kukaan on kykeneväinen syömään. Nyt olenkin ikuisessa kiitollisuudenvelassa vanheneville marjoille, sillä ne inspiroivat - ja pakottivat - minut keksimään fiksun tavan käyttää niitä ja kiitos sen päädyin näihin: kauniisiin, herkullisiin jäihin, joita voi käyttää myös juomasekoittimina.

I work in the berry business and thanks to my employee discount I bring home berries way more than anyone can eat. Now I'm in eternal debt to expiring berries, because they inspired - and forced - me to create a clever way to use them and thanks to that I came up with this: beautiful, delicious ice that doubles as a drink stirrer.
berries1 berries2 berries3 berries5 berries6
Voisin sanoa, että tämä on helpoin DIY ikinä. Sun täytyy ainoastaan täyttää jääpalamuotti marjoilla, peittää marjat vedellä ja antaa jäätyä. Ja lopputuloksena on jotain niin nättiä, että mä vaan valokuvailin niitä aivan kikseissä puoli tuntia.

I could say that this is the easiest DIY ever. All you need to do is to fill an ice cube tray with berries, cover the berries in water and let them freeze. And the ending result is something so pretty that I honestly spent half an hour photographing the damn things. 
berries7 berries9 berries11
Spriten juominen ei ole koskaan ollut näin hauskaa ja vaikka marjoista liukeneekin hieman makua, koko juttu on entistä parempaa, kun sekaan kaataa hieman Smirnoff blueberryä.

Drinking Sprite has never been this much fun and though the berries release a tiny amount of flavor, the whole thing is even better when you pour in a little bit of Smirnoff blueberry.
berries12 berries10
Mä en oikeasti osaa edes kuvailla, kuinka nättejä nää mun mielestä on. Kuplia, marjoja ja jäitä, selkeesti ihan voittamaton trio.

I seriously cannot express how pretty I think these are. Bubbles, berries and ice, clearly an invincible trio. 

2014/07/22

♣ Details make the difference

Kolme faktaa minusta:
#1: On hyvin mahdollista, että olette huomanneet, kuinka tykkään koristella oikeastaan kaikkea. Edes shampanjapullot, aurinkolasit tai korvikset eivät selviä seurassani paria päivää pidempään ilman glitterikerrosta tai uutta väriä. Pienet yksityiskohdat tekevät kaikesta paremman.
#2: Rakastan myös järjestää juhlia. Rakastan väriteeman valitsemista ja siinä pysymisen yrittämistä niin hyvin kuin mahdollista.
#3: Vihaan käyttää paljon rahaa ja yritän aina löytää halvan tavan kaikkeen.

Three facts about me:
#1: It is highly possible that you have noticed how I like to decorate pretty much everything. Not even champagne bottles, sunglasses or earrings survive more than a few days in my presence without getting a coat of glitter or new color. Small details make everything better.
#2: I also love throwing parties. I love picking out the color theme and trying to stick to it as well as possible. 
#3: I hate to spend lots of money and I'm always trying to find a cheap way of doing everything.
marble5
On siis itsestäänselvää, että kaikissa bileissä, jotka järjestän, on hienovarainen väriteema - jos väriteema on punainen, en osta punaisia tuoleja, lautasia ja ilmapalloja, vaan teen punaisia cocktaileja ja ostan punaisia kukkia ja lautasliinoja. Siten juttu pysyy tarpeeksi simppelinä ja maksaa minulle - no, lähemmäs ei mitään.

Loin tämän siistin tavan pysytellä väriteemassa pari viikkoa sitten. Tämä tapa on täydellinen juhliin, sillä koristelu on tehty kynsilakoilla. Okei okei, neljäs fakta musta: koristelen kaiken pakonomaisesti kynsilakoilla, koska pääsen koristeista siten eroon koska vain haluan. Kaikki, mitä tarvitsetkin tätä pikkuista projektia varten ovat pieni rasia ja vettä, hammastikkuja, kynsilakkoja, teippiä ja shottilaseja.

So it is clear that every party I throw has a certain, subtle color theme - if the color theme is red, I don't buy red chairs, plates and balloons, I make red cocktails and buy red flowers and red napkins. That way it is subtle enough and costs me - well, pretty close to nothing.

I created this cool way to stay in the color theme a few weeks back. It is prefect for parties since the decoration is made with nail polish. Okay okay, a fourth fact about me: I am obsessed with decorating with nail polishes because I can get rid of it whenever I want. Everything you will need for this tiny project is a small container and water, toothpicks, nail polishes, tape and shot glasses.
marble2
Lyhyesti idea on vesimarmoroida shottilasien pohjat - ja kyllä, voit tehdä saman myös normaaleille juomalaseille, kynttiläkupeille tai maljakoille, periaatteessa minkä vain tahdot koristella. Vesimarmorointi on superyksinkertaista kun vain ymmärrät sen, enkä mä ole kovin hyvä yksityiskohtaisessa selittämisessä, joten suosittelen siirtymään youtubeen ja etsimään helpon vesimarmorointitutoriaalin sieltä. Usko pois, se on helppoa. Älä pelkää.

Briefly the idea of this project is to water marble the bottoms of shot glasses - and yes, you can do this to normal drinking glasses, candle holders or vases, basically anything you want to decorate. Water marbling is super easy once you understand it, and I'm not very good at detailed explaining, so I recommend going to youtube and finding an easy water marbling tutorial there. Believe me, it is easy. Don't be scared.
marble3
Kun olet saanut otteen vesimarmoroinnin perusjutuista, teippaa shottilasien reunat niin, että vain pohja on paljas. Tiputa sitten pisaroita kynsilakkaan rasialliseen kylmää vettä ja muotoile abstrakti kuvio hammastikulla - muista vain toimia nopeasti, sillä kynsilakka asettuu aika pian.

When you've got the hang of water marbling, tape the sides of shot glasses so that only the bottom is showing. Then drop drops of nail polish into the container of cold water and style your abstract design with a toothpick - remember to make it quick, the nail polish sets quite fast.
marble1 marble4
Hammastikulla leikkimisen jälkeen dippaa hitaasti shottilasi veteen ja kerää ylijäämäkynsilakka ympäriltä hammastikulla. (Ihan oikeasti, katsokaa youtubetutoriaali, edes mä en ymmärrä tästä selityksestä mitään, vaikka vähintään mun pitäisi). Sen jälkeen nosta shottilasi vedestä ja aseta kuivumaan. Kuivumisen jälkeen poista teipit ja oletkin valmis!

After playing with the toothpick slowly dip the shot glass into the water and gather the excess nail polish with a toothpick. (Seriously, watch a youtube tutorial, even I don't understand this explanation and I'm the one who should at least). Now raise the shot glass from the water and set to dry. When it has dried, remove the tapes and you're all done!
marble6
Mikä lopulta yllätti minut eniten positiivisesti oli se, että nämä shottilasit päätyivät astianpesukoneeseen vahingossa. Ja uskokaa tai älkää, mutta kynsilakkakerros säilyi moitteettomasti! Eli kyllä, voit pestä nämä ja kun haluat kuviosta eroon, pyyhi se vain pois kynsilakanpoistoaineella. 

Siinäpä se, superhelppo tapa pysyä väriteemassa lähes kokonaan ilman rahaa tai vaivaa.

Now, what surprised me positively was that these shot glasses accidentally ended up in the dishwasher and believe it or not, the coat of nail polish survived impeccably. So yes, you can wash these and when you want to get rid of the decoration, just wipe it off with nail polish remover.

There, a super easy way of staying in the color theme with almost no money or trouble at all.

2014/07/08

♣ Color my world.

colaa3
Mä rakastan matkustamista (kukapa ei) mutta mun heikkous on matkustaa vain EU:n sisäpuolella, sillä lennot ovat täällä reilusti halvempia. Jokainen Euroopan maa on totta kai upea ja käymisen arvoinen, mutta mä haluan nähdä maailman ihan oikeasti, matkustaa kauemmas ja kokea eri kulttuureja Euroopan ulkopuolelta.

Mä kuitenkin tarvitsen apua sen kanssa. Olen aina tahtonut kartan jonnekin, johon voisin jollain tapaa merkitä kaikki maat, joissa olen käynyt. Keksin kuitenkin vasta viime viikolla söpön DIY-idean, jolla pääsen esittelemään jokaista reissuani. Tämä kehystetty taideteos on äärettömän helppo tehdä ja kannustaa matkustamaan enemmän ja kauemmas kuin ennen.

Tätä projektia varten tarvitset pahvia, paperia, mattoveitsen sekä vesivärejä tai muunlaista maalia - tai jotakin muuta, millä koristella tausta.

I love traveling (who doesn't) but my weakness is that I always end up traveling inside the EU because the flights are cheaper. Every country in Europe is, of course, absolutely stunning and surely worth visiting, but I crave to fully see the world, travel further and experience cultures outside Europe.

However, I need help with that! I've always wanted to have a map somewhere and somehow mark every country I've visited and it wasn't until last week when I came up with a cute DIY idea to present all of my trips. This framed wall art is easy to make and it encourages you to travel more and further than before.

For this project you will need cardboard, paper, a box cutter and watercolors or some kind of paint - or something else to decorate the background with. 
colaa1 colaa2
Mun mielestä vesiväritaide on mahdollisesti söpöintä taidetta, mitä maailmasta löytyy. En harmillisesti kuitenkaan edes omista vesivärejä, joten kauniin läiskätaiteen luominen oli... haastavaa, sanoisinko. Sudin pahvin täyteen erivärisiä pensselinvetoja akryyliväreillä, joita olin ohentanut hieman vedellä. Voit käyttää tavallista paperia tai vesiväripaperia, muista vain liottaa paperi etukäteen tai teipata se tasoon, jotta se ei alkaisi aaltoilemaan aivan hirveästi. Itse valitsin käyttää pahvia, sillä pahvin kanssa tätä ongelmaa ei ilmene ja voit maalailla aivan huoletta rypyistä piittaamatta.

Nyt tulosta ääriviivat maailmankartasta paperille (mielellään hieman normaalia paksummalle paperille) tai piirrä kartta itse, jos olet hyvä senkaltaisissa jutuissa (minä en). Ota sitten esiin mattoveitsi ja leikkaa irti kaikki maat, joissa olet käynyt. Tässä kohdassa kärsivällisyys palkitaan, älä kiirehdi tai lopputuloksena on maailmankartta täynnä vahingossa tehtyjä viiltoja siellä täällä. Kaikkien maiden leikkaamisen jälkeen aseta kartta ja kuivunut taustapahvi päällekkäin ja kehystä.

I think watercolor art is probably the cutest art there is. I, unfortunately, do not own watercolors, so creating this beautiful splatter art was... challenging, should I say. I used acrylic paint that I had thinned a bit with water and just randomly stroked different colors across the cardboard. You can use regular paper or watercolor paper, just soak it beforehand or tape it to a board so it doesn't wrinkle a lot. With cardboard you can just paint without any troubles or worries about wrinkling so that's why I chose to use cardboard.

Now print an outlined world map to a paper (preferably a slightly thicker one than usual paper) or draw one yourself if you're good at that type of thing (I'm not). Now take out our box cutter and start cutting out every country you've visited. Here patience will be rewarded, don't rush it or you'll end up with a world map full of accidental cuts all over. After cutting out your countries place the map and the dried background paper on top of each other and frame it.
colaa4
Tältä se lopulta näyttää! Mä olen istunut lentokoneessa niin tylsistyneenä kuin innostuneenakin reilusti yli 20 kertaa elämäni aikana ja silti mun kartta näyttää niin valkoiselta ja kovin surulliselta. Toki mun täytyy pitää mielessä, että olen käynyt Mallorcalla kaksi kertaa, Espanjassa reilu kolme kertaa, Ranskassa myös kahdesti, Briteissä kolmesti, Virossa ja Ruotsissa vähintään miljoonasti. Mutta tuntemattomiin maihin matkustamisen halun sytyttäminen olikin tämän taideteoksen tarkoitus ja sitähän se juuri tekeekin. Eli se toimii. Ensi kerralla matkustan ihan varmasti Australiaan tai Venäjälle.

Ja... paras osuus on, että kun kyllästyt vesivärisotkutaustaan, voit helposti vaihtaa sen uuteen. Mä olen peruuttamattomasti rakastunut glitteriin ja kun multa kysytään, mikä mun lempiväri on, vastaan vaistomaisesti "kulta", eli kimaltava kultainen paperi taustapaperina toimi mulle myös aivan täydellisesti.

Here's how it will turn out. I've sat both bored and excited in a plane way more than twenty times during my lifetime and still my map looks so white and sad. Of course, I have to keep in mind that I've visited Majorca twice, Spain more than three times, France also twice, the UK three times, Estonia and Sweden a million times. But making me want to travel more and to unknown countries is what this piece of wall art was supposed to do and that's exactly what it's doing. So it's working. Next time I'm gonna visit Australia or Russia for sure.

And... the best part: if you get sick of the watercolor mess background, you can always switch it to a better one. I am irrevocably in love with glitter and when someone asks what my favorite color is, my immediate answer is "gold", so a glittery golden paper as the background worked perfect for me as well.
Ja joo, tiedän, että olen käynyt Yhdysvalloissa, mutten leikannut pois Alaskaa - tämä vain sen takia, että haluan käydä siellä, mutten koskaan tule käymään, jos se on jo leikattu pois. Ei kommentteja siitä.

And yes, I know I've visited United States and didn't cut out Alaska - that's only because I still want to visit it and I won't if it's already cut. No comments about that.

2014/07/02

♣ Joskus sattuu, mitä siitä.


bandaid5 Mä uskon että meillä kaikilla on se kaveri, joka, humalassa tai ei, onnistuu aina satuttamaan itsensä. Tunnistat tämän kaverin siitä, että seinät tulevat hänen tielleen, hänellä on tapana hyökätä lattialle yhtäkkiä ja hänen raajansa ovat täynnä mustelmia, koko väriskaala aina tummanvioletista kellertävään. Ei ole aina helppoa olla hänen kaverinsa - sinun täytyy kuljettaa ensiapupakettia kaikkialla, pitää sairaalan numeroa pikavalinnassa ja erityisesti osata kontrolloida naurusi, kun he kaatuvat portaat alas. Mulla on kuitenkin hyviä uutisia kaikille joiden täytyy olla näitä ystäviä - nyt on vähintään olemassa täydellinen lahja, jonka voit tehdä kömpelölle kaverillesi.

Nämä (lähes) itsetehdyt laastarit kertovat, mitä uhrille on tapahtunut. Voit laittaa niihin persoonallisia insideläppiä tai normaaleja jokapäiväisiä tapaturmia, kuten hain pureman, ninjojen hyökkäyksen tai ampumahaavan. Mä tein näitä laastareita poikaystävälleni. Mulla on terävät kynnet joilla aina satutan häntä, joten yhdessä laastarissa lukee "girlfriend". Joka kerta kun hän juo, hän saa mustelman tai haavan, joten yhdessä lukee "unknown drunken injury". Ja lähes viikottain hän saa pieniä ruhjeita, joten yhdessä sanotaan "I don't even know". Mutta siirrytään eteenpäin, tässäpä ohje, miten minä tein ne!

I think we all have that one friend who, intoxicated or not, always manages to get hurt. You can recognize this friend if the walls get in their way, they tend to attack the floor randomly and their limbs are covered in bruises, all from dark purple to yellowish ones. It's not always easy being their friend - you have to carry a first aid package everywhere, have the hospital's number in speed dial and especially know how to control your laugh when they fall down the stairs. However, I have good news for everyone that needs to be that friend - now there's at least a perfect gift you can make for your awkward friend.

These (almost) homemade band-aids tell what has happened to the victim. You can put your personal inside jokes in them or casual everyday incidents, such as shark bite, ninja attack or bullet wound. I made these band-aids for my boyfriend. I have sharp nails and I always hurt him with them, so one band-aid says "girlfriend". Every time he drinks, he gets a bruise or a scar, so one says "unknown drunken injury". Almost weekly he gets small contusions, so one says "I don't even know". But let's move on, here's how I made them!
bandaid1
Voit käyttää kangasta tai jopa maalarinteippiä - mikä tahansa vain tuntuu toimivalta. Mä käytin kangasta, joten käytän sitä termiä näissä ohjeissa. Leikkaa kankaanpalasia normaalin kaupastaostetun laastarin kokoisiksi. Nyt voit värjätä ne, jättää ne valkoisiksi tai käyttää alunperinkin erivärisiä kankaita - mulla ei ollut yhtään kangasta kotona, joten jouduin leikkelemään oman valkoisen t-paidan ja värjätä kaikki kankaanpalat. Värjäämisprosessi on suhteellisen helppo, sen voi tehdä aika pitkälti kaikella mikä jättää tahroja tai väriä jälkeensä. Mä miksailin akryyliväriä veteen, sekoitin ja heitin palaset sekaan ja hetken odottelun jälkeen nostin ne pois ja laitoin kuivumaan. Jos niissä ei ole yhden värjäyskerran jälkeen tarpeeksi väriä, voit värjätä ne kaksi tai kolmekin kertaa.

Värjäämisen jälkeen voit siirtyä suoraan kirjoitusosaan, mutta jos palat ovat ryppyisiä, suosittelen silittämään ne, jotta ne ovat täysin suoria. Suosittelen myös, että laitat kankaan päälle palan leivinpaperia, koska ei oikeastaan koskaan voi tietää päästääkö kangas vähän väriä ja uskoisin, ettet tosiaan halua itsellesi sinistä silitysrautaa. Ja jos silitysraudan ja -laudan kaivaminen kaapista tuntuu liian työläältä, myös tavallinen hiusten suoristusrauta hoitaa asian - sitä minäkin käytin!

Now, you can use fabric or even painter's tape - whatever seems suitable. I used fabric, so I'll be talking about fabric in these instructions. Cut pieces of fabric to the size of regular store-bought band-aids. Now you can dye them, leave them white or you can use different colored fabrics - I didn't have any fabric at home so I had to cut a white t-shirt in pieces and dye all the fabric strips. The dyeing process is quite easy, you can do it with pretty much anything that leaves stains and color. I mixed acrylic paint with water, threw the strips in and after a while set them to dry. If they don't have enough color, you can always dye them two or even three times.

After dyeing you can either move directly to the writing part, but if the strips are wrinkled I suggest you iron them so that they are completely straight. I also suggest you put a piece of parchment paper on top because you never know if it will let go some color and you don't want to end up with a blue iron. And if you don't feel like setting up your ironing board and iron, a hair straightener will do the trick as well - that's what I used!
bandaid2 bandaid3
Nyt kirjoitusosaan. Teippasin palan leivinpaperia koneen näytölle, sitten kankaanpalan ja kirjoitin koneella tekstin, jonka siirtelin kankaanpalan alle. Älä missään nimessä unohda leivinpaperia, sillä jos näin käy, sulla on kohta tussintöhrimä näyttö. Piirtele mustalla tussilla pelkästään kirjaimien ääriviivat ja väritä ne myöhemmin tai väritä koko juttu suoraan koneen näytön ääressä kerralla - miten vain tahdot.

Kun kankaanpalaset ovat valmiit, olet lähellä maaliviivaa. Nyt ainoa askel onkin levittää pensselillä liimaa laastarien päälle ja painaa kankaanpalat päälle. Kun liima on kuivunut, lopputuloksena on täydellisen toimivia laastareja, jotka ovat samalla hauskoja ja persoonallisia.

Now to the writing part. I taped a piece of parchment paper onto my computer screen, then the fabric strip and wrote my text on my computer and placed it under the fabric. You don't want to forget the parchment paper because if you do, you'll end up with a marker-stained computer screen. With a black marker you can only draw the outlines and color in the letters later, or color it completely all at once.

When the strips are done you're very close to the finishing line. Now the only step is to brush glue on your band-aids and press the fabric strips on top. After the glue has dried, you have perfectly functional band-aids that are funny and personal at the same time. 
bandaid4 bandaid6 bandaid8